BroScience
Initial Enumeration
Initial nmap scan reveals ssh, and what looks like a website on 80 and 443:
|
|
|
|
Attempting to visit the website on port 80 automatically redirects us to port 443 to what appears to be a website dedicated to working out.

In the top right corner there is a “login” button that leads to a login page. on that page, there’s an option to create an account. If we register, we get a message saying the account was created, and we have to check our email for the activation link. If we attempt to login with our credentials, we get the message “Account is not activated yet”. As an email is not actually sent, we cant login for the time being. lets leave that for now.
LFI
If we view the source on the homepage, we can see that the images are sourced from the includes/img.php page, with the path to the image passed in to the path parameter. For example:
|
|
This smells like a good place to check for an LFI vulnerability. If we click on any image link, intercept it in Burp, and send that request to repeater, we can play with the request to see if we can read files.
An initial test with plain ../../../../../../../etc/passwd shows that our attacks are being stopped by some sort of filter.

after a little more enumeration, it looks like any request containing ../ will get blocked. We can try to URL encode (I like using cyberchef):
|
|
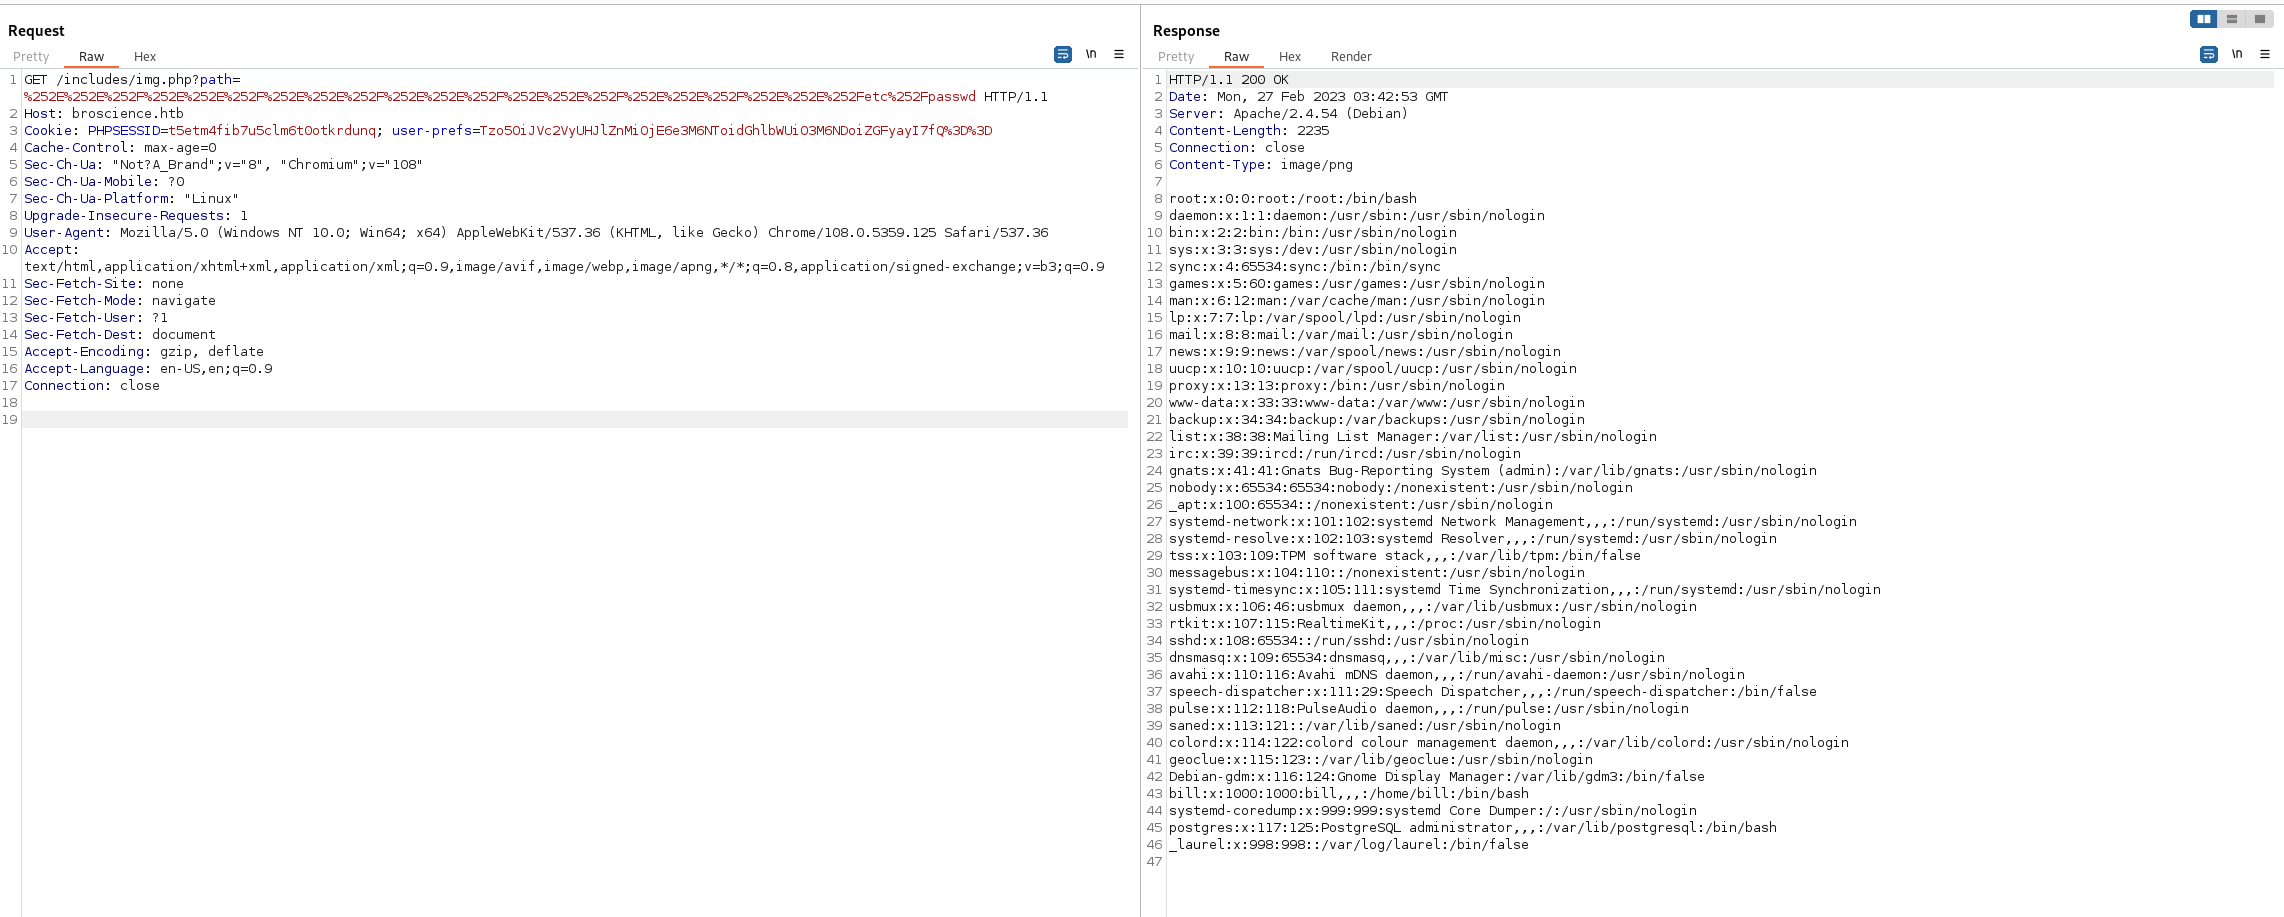
But this doesn’t seem to work. However, if we double URL encode, this seems to bypass the filter:
|
|

In the above output, the user bill stands out as the only user besides root who seems to have a shell. We can also not the presence of the postgres user, indicating the website is probably using a Postgres db on the backend.
Website source code enumeration
Now that we can read files, its a good idea to try to read the source code of the website to see if we can find any vulnerabilities that lead to RCE, or at the very least allow us to activate the account we made earlier.
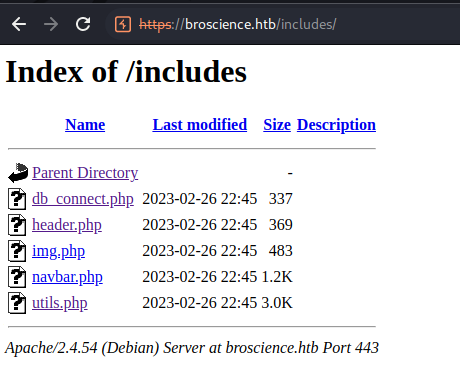
We can start with register.php, and continue to the contents of the includes directory, which can be listed by simply visiting https://broscience.htb/includes/:

db_connect.php and utils.php look especially important. the db_connect file has creds for the Postgres db:
|
|
Those creds don’t seem to work with anything, so we’ll save them for later.
The first function in the utils file has the code used to generate the activation code:
|
|
It looks like a random code is being generated. However, it looks like the seed for the random code generator is set by taking thee current time (see the docs for srand()). This means that if we get the time from our account creation request, we should be able to generate the activation code. Create a new account while proxying the traffic. The date can be seen as follows:

We can then copy the function into our own script and run it on the command line. We can convert our date string to a timestamp with strtotime(), or by using a website such as https://www.epochconverter.com/. The script is as follows:
|
|
|
|
We can then visit https://broscience.htb/activate.php?code=afM8AdVdRM52K3k6LwxrA09cAqgCLAp5 to activate our account (the URL for activation can be found on line 44 of register.php).
PHP deserialization
After logging in, we see we can toggle the site between light and dark mode with the paint can icon in the upper right corner. Lets see if we can see this functionality in the code. At the bottom of utils.php, we can see some interesting theme and avatar functionality in the code:
|
|
If we read through the code above, it seems that the users theme preference is stored in the user-prefs cookie as a base64 encoded serialized PHP object. We can see this by grabbing the cookie from any of our previous requests, and decoding it:
|
|
Here’s a breakdown of the string:
Oindicates that this is an object.9indicates the length of the class name"UserPrefs"."UserPrefs"is the name of the class.1indicates that there is one property in this object.{marks the beginning of the object’s properties.sindicates that the following data is a string.5indicates the length of the property name"theme"."theme"is the name of the property.sindicates that the following data is a string.5indicates the length of the string value"light"."light"is the value of thethemeproperty.}marks the end of the object’s properties. Now that we understand how PHP objects are serialized, we can try to leverage this into RCE. Taking a closer look at the code, it doesn’t look like the theme functionality is vulnerable. However, theAvatarandAvatarInterfaceclasses look promising. TheAvatarInterfaceclass has a__wakeup()function which is called when an object is deserialized. When a new instance ofAvatarInterfaceis deserialized, it creates a new instance ofAvatar, which has functionality to write the contents of the file pointed to by the$tmpvariable form theAvatarInterfaceinto a file specified in$imgPath. TheAvatarclass usesfile_get_contents()to fetch the data in the resource pointed to in the$tmpvariable. If we read the manual for thefile_get_contents()function, we see that a remote URL can be passed in as the source. Taken all together, this means we can create a serialized instance of theAvatarInterfaceclass with the path set to something like/var/www/html/shell.phpand the$tmpvariable as a file hosted on our machine containing a webshell, thus causing our webshell to be written to the webserver in a location where we can reach it when the object is desterilized. If this isn’t clear, I recommend putting the above PHP code into ChatGPT and asking for an explanation, and reading up on PHP deserialization attacks. A good explanation can be found here.
My serialized, unencoded payload looks like this:
|
|
My webshell that is hosted on a webserver form my machine as shell.php is:
|
|
The serialized object can be base64 encoded and set as the auth cookie, and the request sent. You should see your webserver get hit by requests to GET shell.php.
You can verify it work by visiting https://broscience.htb/shell.php?cmd=id.
You can then get a reverse shell using a payload from a website like https://www.revshells.com/. I personally chose the Python3 #2 payload.
Its important to note that this attack can only be carried out as an authenticated user, as the code checks that a valid session with an ID has been established.
Escalation to bill
Cracking Bill’s hash.
We land on the machine as the www-data user, but the user flag is in bill’s home, and is unreadable, so we have to find a way to get a shell as bill. If you remember from earlier, we have credentials to the Postgres DB from the dc_connect.php file. We can use these credentials to log in:
|
|
If you get errors like could not identify current directory: No such file or directory, try going out of and back into the current directory and trying again.
Once logged in, we can list tables with \dt, and then select everything from the users table with:
|
|
|
|
If you try to crack these hashes straight, you wont get anywhere. This is because, if you remember from the db_connect file, there is a salt ("NaCl") being added to the passwords as they are hashed. If we take a look at line 41 of register.php, we see that the salt is added before the password, and then hashed:
|
|
In order to crack these hashes, we have to format them correctly. If we look at the Hashcat examples page, we see that mode 20 is MD5 of a salt, followed by the password. The hash format is MD5-HASH:SALT:

My hashes.txt file looks as follows:
|
|
We can then crack with:
|
|
By matching the cracked hashes to the hashes in the DB, we can see that Bill’s password is iluvhorsesandgym. This works to log in with ssh.
Escalation to root:
If we look around the file system, we find a script in /opt/renew_cert.sh. If we view the file, we can see that its a script that renews certs if there is less than 1 day (86400 seconds) until the certificate expires.
We can download and use pspy and see that root is running the following on a periodic basis:
|
|
If we follow the logic of the script, we see that the following happens:
- check if the cert passed in as the argument expires within the next day
- if it does, get all the information out of the cert and store it in variables.
- print that information out to the terminal.
- generate a new certificate with the old information, and output it to
/tmp. - copy the
.crtfile from/tmpinto Bill’s home directory in theCertsfolder, with the common name of the cert as the file name. What we can take advantage of is the fact that the common name of the cert is being used to build the command that moves the cert from/tmpto/home/bill/Certs/in this line:
|
|
Seeing as we can create a cert that expires within the next day, and put whatever we want as the common name, we can inject code when root runs the script next. Lets set the common name to a command that will add bill to the sudoers file, and let him execute anything without a password, essentially giving us root. The common name will be as follows:
|
|
Generate the new certificate with:
|
|
And the contents of /tmp/s.sh:
|
|
Thew reason we are prepending and appending test and echo test is so that the script doesn’t break from our payload. essentially, this is now what gets executed at the end of the script:
|
|
Now wait for root to execute the script, and elevate with:
|
|
