Security Detection Playground - Part 1
Introduction
Welcome to my blog series on creating a hands-on threat detection lab! This series is designed to guide you through constructing a practical environment for experimenting with real-world security tools and technologies. You’ll gain valuable experience in security engineering by setting up a lab on Proxmox, configuring an Opnsense firewall to isolate VMs, and building an Elasticsearch cluster for a SIEM. We’ll cover shipping and filtering logs, writing detections, setting up alerts with destinations like Discord, and testing detection coverage using Windows and Linux machines with Atomic Red Team.
Note: In this series, I’ll dive into detailed walkthroughs only when there isn’t already a solid tutorial or guide out there for what we’re trying to do. For example, if there’s a thorough resource on setting up Proxmox for the first time, I’ll give you a quick rundown of what we’re doing and why, then point you to those resources for the step-by-step. I’ll also add some extra tips on how to tweak things to fit our specific lab setup.
Another note: This series assumes you have a decent grasp of basic networking, Windows and Linux, and scripting with Bash and Python. It is not intended to be for extreme beginners, and will assume familiarity with a lot of basic computing concepts. If you’re looking to get started in security, and computers more broadly, I recommend checking out TryHackMe, which is an awesome platform that has a lot of step by step tutorials, and will spin up labs for you.
Hardware
If you plan on following along with building the lab, I suggest getting some dedicated hardware to run it all on. I personally went with a Beelink SER8 mini PC, but I realize that this could be out of reach for some folks. If you don’t want to spend a bunch of money on something new, a good option is to look around some of the used marketplaces where there are usually deals to be had. I would recommend a fairly recent Ryzen 5 or i5 processor or above, with at least 16GB of RAM, and 1TB of solid-state storage. This should be fine, especially if you turn off parts of the lab when you’re not using them.
Setting up Proxmox
We’re going to use [Proxmox](https://www.proxmox.com/en/] for the hypervisor to run all the rest of the VMs in our lab. Proxmox is very popular amongst homelabbers, and is gaining popularity in the business world since Broadcom bought VMware and raised the price of Vsphere/Vcenter. It’s completely free, and has all the features we need for our lab, and then some. Here are some resources for installing Proxmox on your chosen hardware:
- https://www.youtube.com/watch?v=kqZNFD0JNBc
- https://community.home-assistant.io/t/installing-home-assistant-os-using-proxmox-8/201835 (Use steps 1 and 2).
- Absolutely check out https://community-scripts.github.io/ProxmoxVE/. It has a huge library of scripts to help automate your proxmox setup. At a minimum, I recommend running this script and this script immediately after finishing the install.
Setting up Opnsense
The rest of this post will focus on getting an Opnsense VM created and configured with proper interfaces and rules, as well as a VPN for accessing resources within the lab network from your personal PC.
Create the Opnsense VM
Before we create the Opnsense VM, we need to add a network interface that will end up serving as the LAN side of the router. This is easily done by selecting the pve node from the datacenter view on the left of the proxmox interface and going to the network tab as shown below.
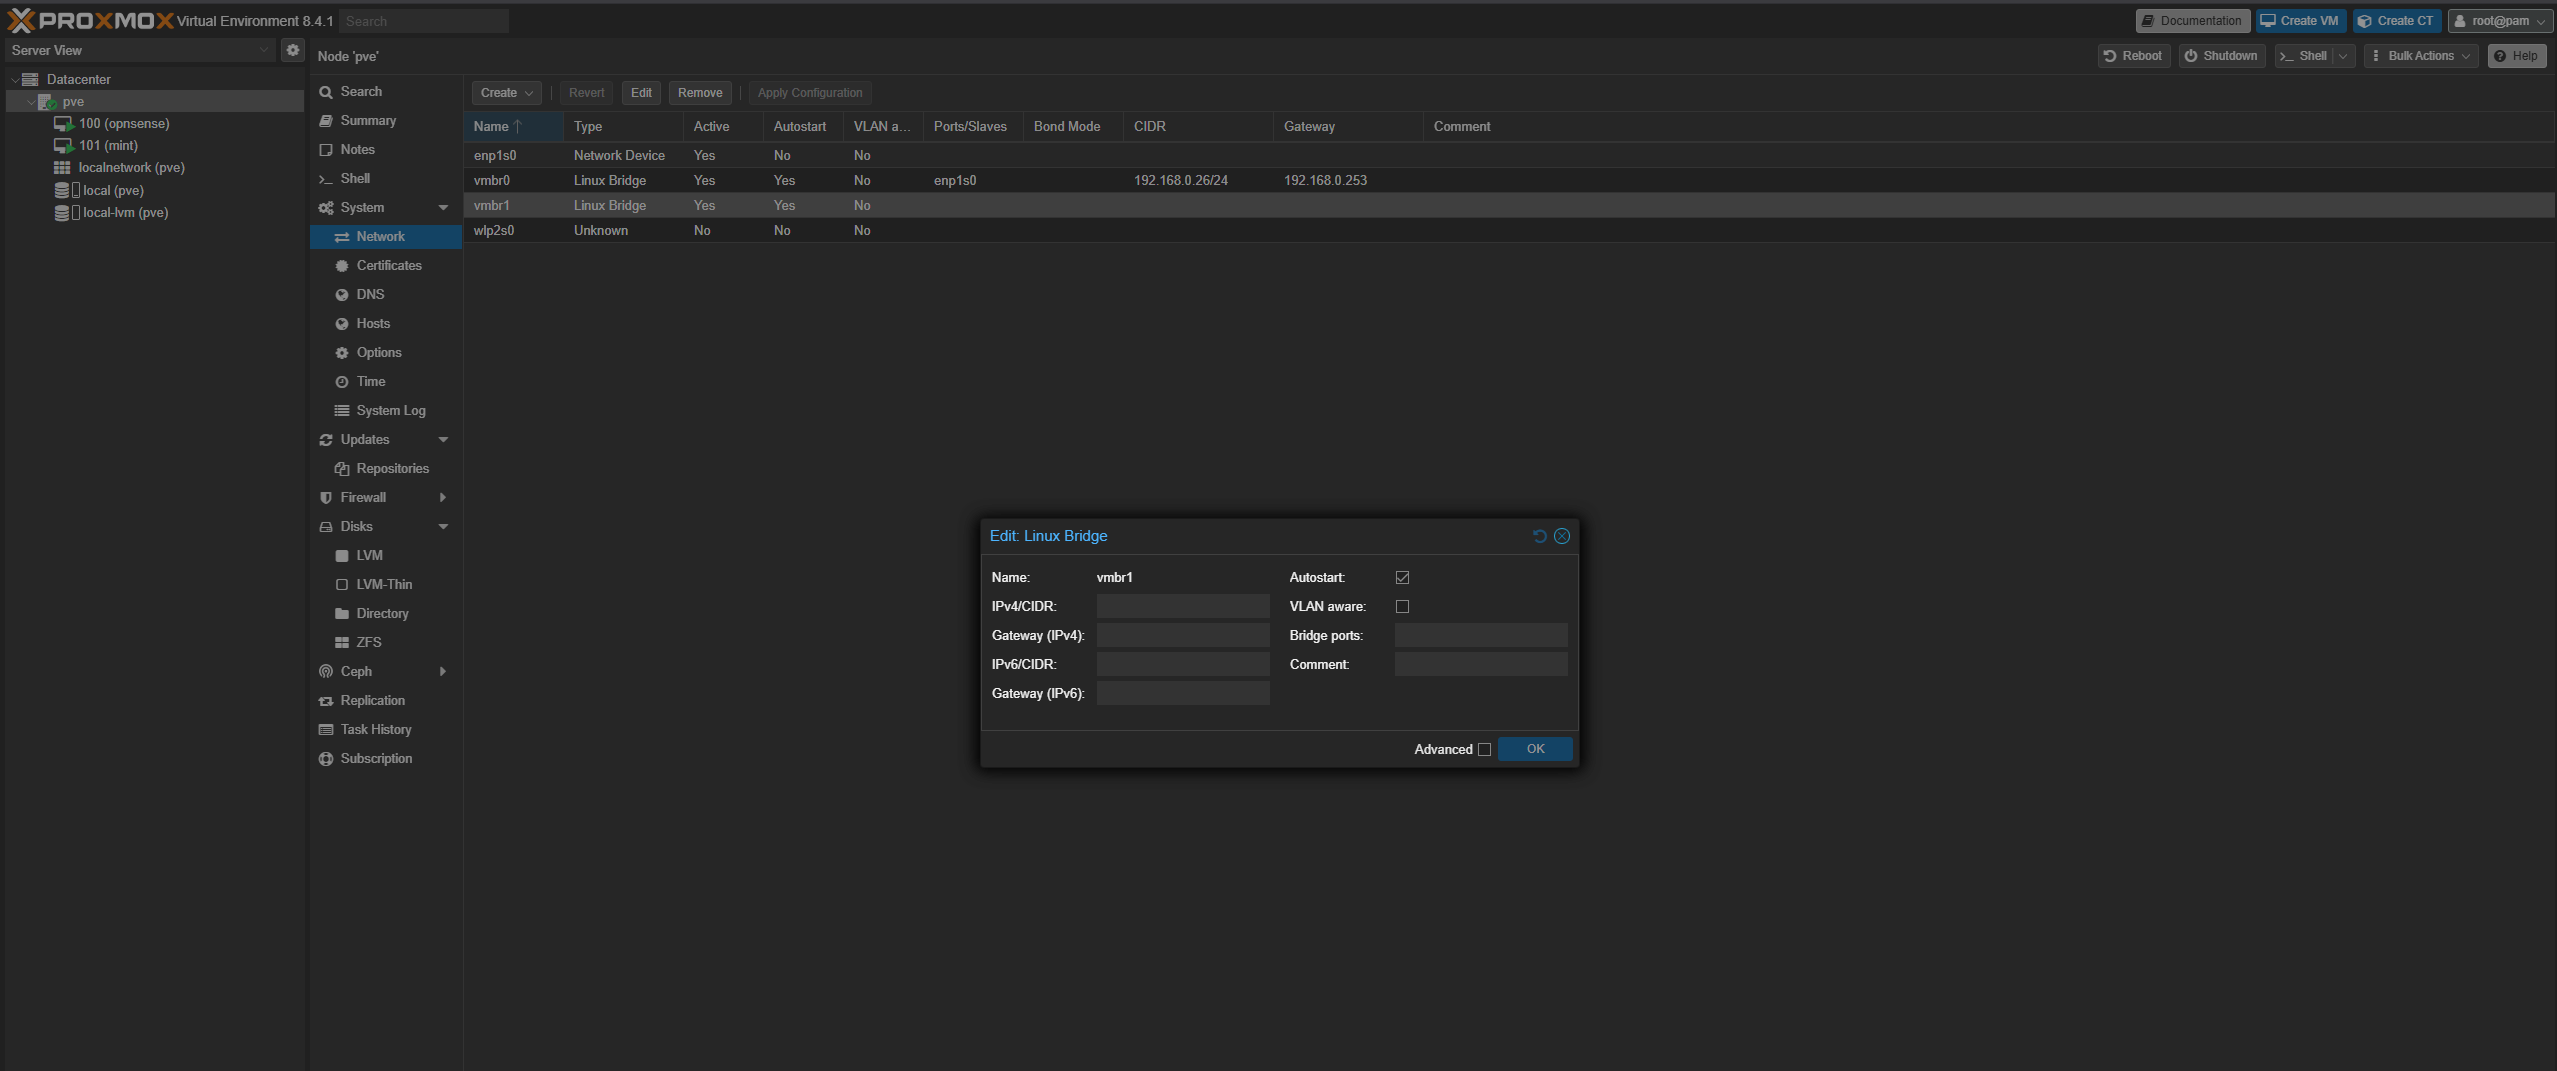 Click create, and select
 Linux Bridge. Leave the device name as vmbr1, and leave all the other settings alone. We will not be assigning addresses to this interface.
Next, download an ISO for Opnsense from the Opnsense website.
Create a new VM and name it Opnsense. I created mine with 4 CPU cores and 4Gb of RAM, but you can probably get away with using 2 CPU cores and 2Gb of RAM. I gave the drive 50Gb of storage.
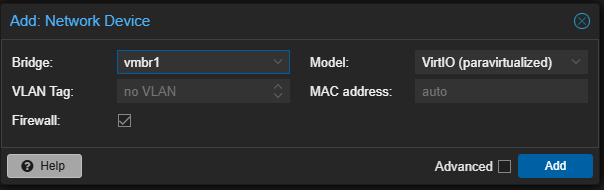
Before turning it on, make sure to add the vmbr1 network interface to the VM in the “Hardware” tab for the Opnsense VM.
 After that’s done, boot up the VM and open the console. wait for the boot sequence to finish without pressing any keys, and then log in with the user
 installer and the password Opnsense. This will kick off the installer. Go through the installer, and don’t bother changing the root password at the end. After the reboot, log in with the credentials root:Opnsense to get to the console. What we’re going to do is assign vmbr0 to the LAN interface in order to import a config that I already set up. The reason for this is that by default, the management UI for Opnsense cannot be reached from the WAN side (for good reason), and doing it this way saves you from having to create another VM on the LAN side just for initial config. The config that I share will set up Opnsense with the following:
- The
10.0.0.0/24network on the LAN side with DHCP enabled. - A static address for the WAN side, with the correct gateway configuration.
When we are done, the vmbr0 interface will be our WAN side, and the vmbr1 interface will be the LAN side, where all the rest of the VMs in the lab will live. In order to do the config however, we will assign vmbr0 as the LAN side, and manually set an address so that we can reach the UI.
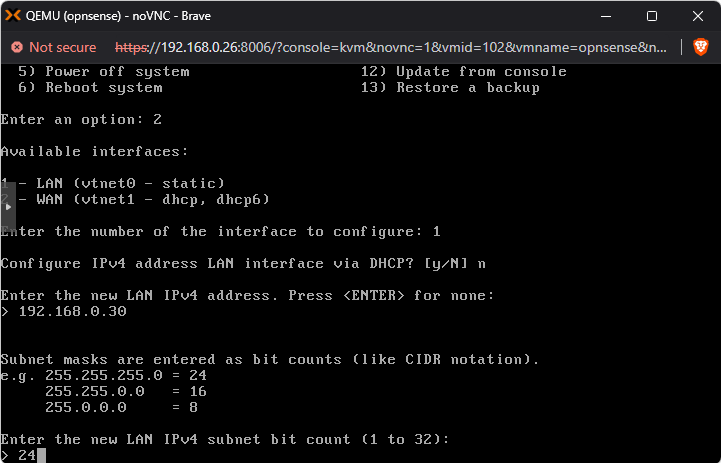
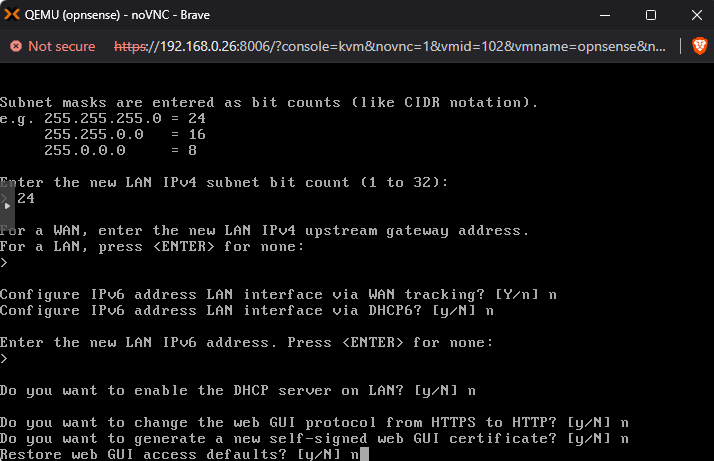
We can do this by first using option 1 to assign vtnet0 (the name of the vmbr0 interface in Opnsense) to the LAN side if this was not done by default.
Next, use option 2 on the console menu to set the interface IP address. Set it to the static IP address you intend to give to the WAN side which in my case was 192.168.0.30. I highly recommend setting a static IP address because we will be referencing this later to set up the VPN, which we will continuously use to access machines in the lab, and we don’t want this to change. Just make sure you assign an IP address that will not be handed out by your local DHCP server, as this might cause issues. You can see my config in the screenshots below:
At this point, you should be able to log into the management GUI at the address given in the console, in my case https://192.168.0.30/. Log in with the same root:Opnsense credentials. We are now ready to import the base config I set up. Download the config from my Github. Open it in your favorite text editor, as we need to change 2 things:
- Search for
<ipaddr>192.168.0.30</ipaddr>and change that to the static IP you picked earlier. This will become the address of the WAN side of your router. - Search for
<gateway>192.168.0.253</gateway>and change this to the gateway of the network that the WAN interface is on. This will most probably be the same default gateway as your workstation which you can find with aipconfigon Windows, ornetstat -rn | grep 'default'on Mac.
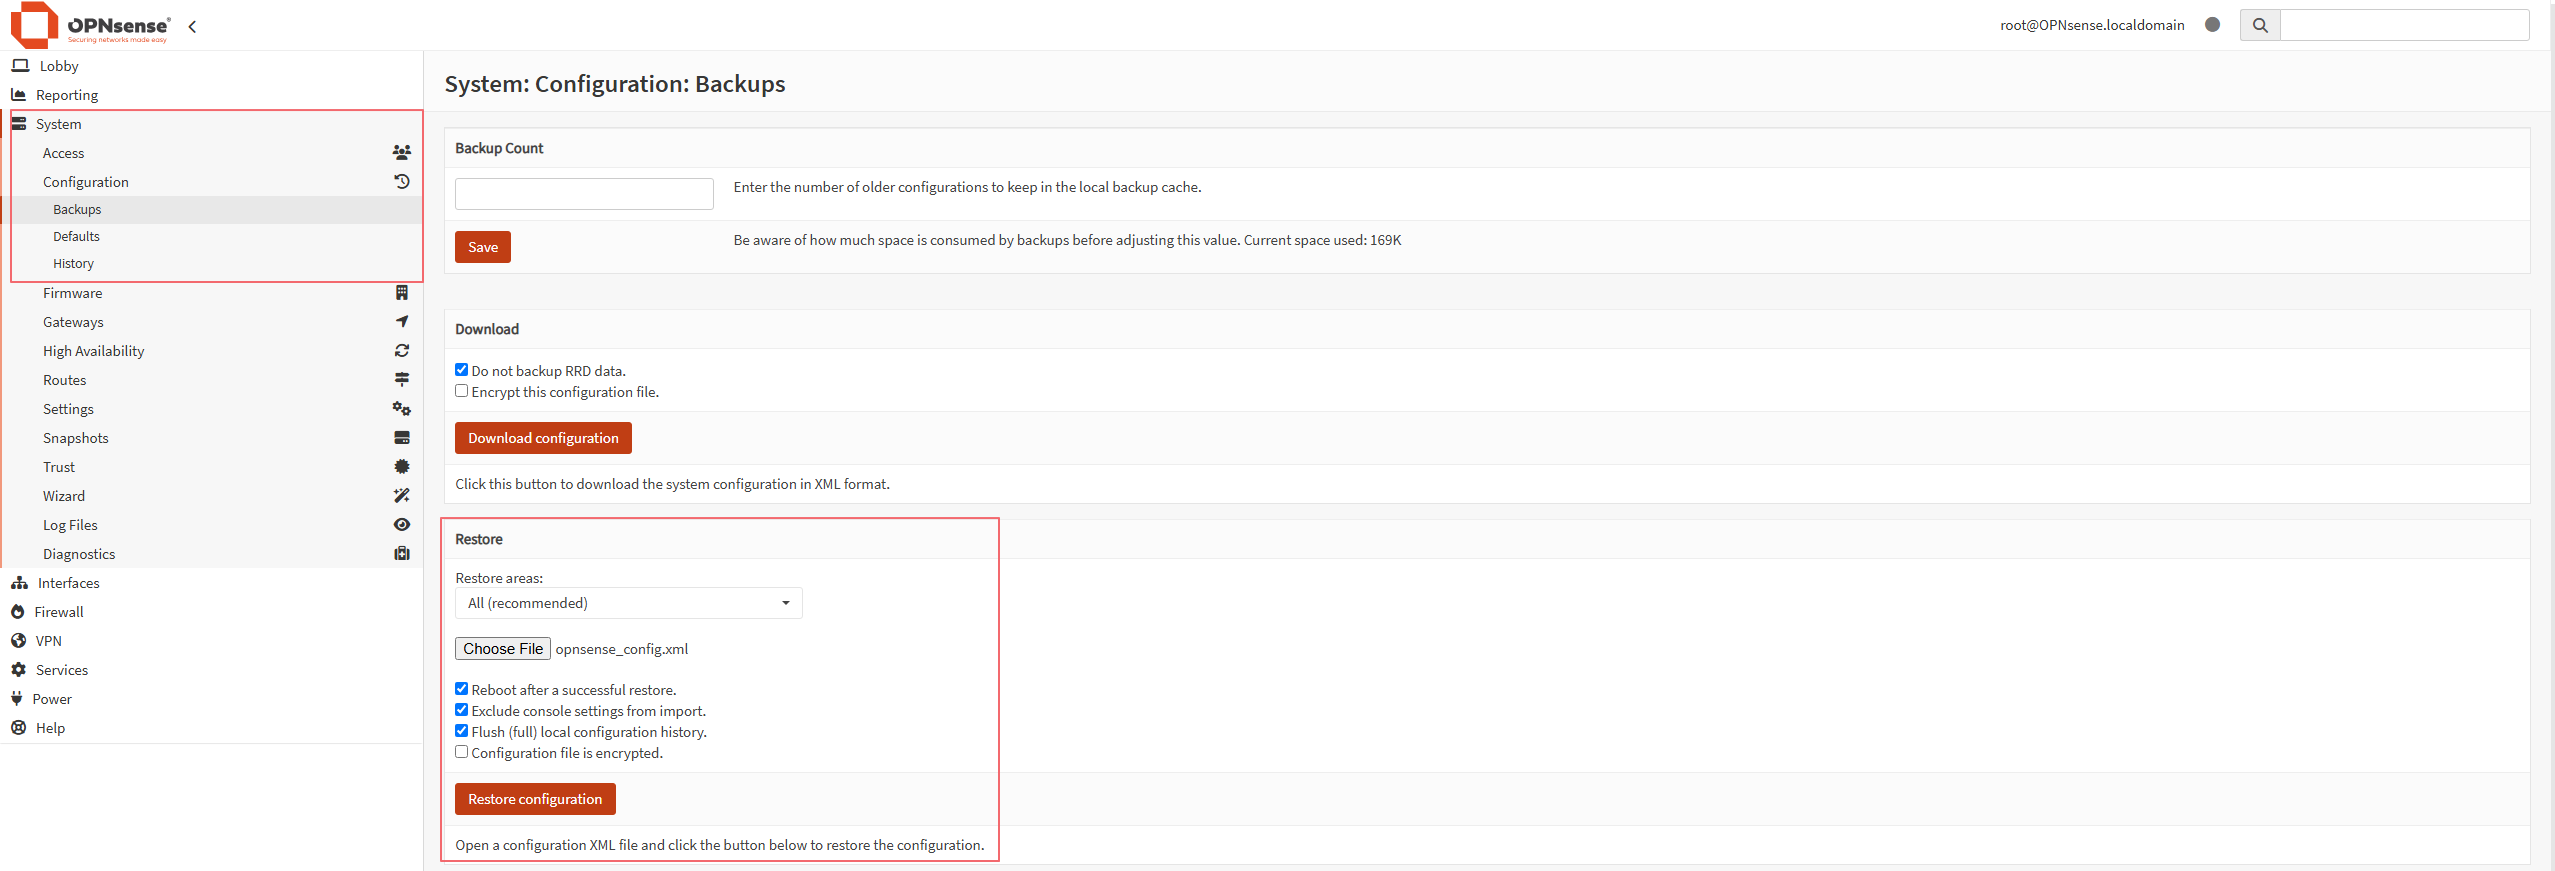
Save your changes, and go to System > Configuration > Backups in the Opnsense GUI. Select Choose File from the Restore section, and select the config, and then click Restore configuration.
 Opnsense should reboot and after it’s done, you should be able to log back in from the same web address, except this time, you will be logging into the WAN interface of the router. Take a moment to change the root password, and familiarize yourself with the interface. You should also install the latest updates.
Setting up the VPN
We are going to set up a WireGuard VPN so that we can access machines in the lab from our workstation. We could go with Openvpn as well, but WireGuard is supposed to be lighter and faster. If you so choose, you can also try Tailscale VPN via the available Opnsense plugin.
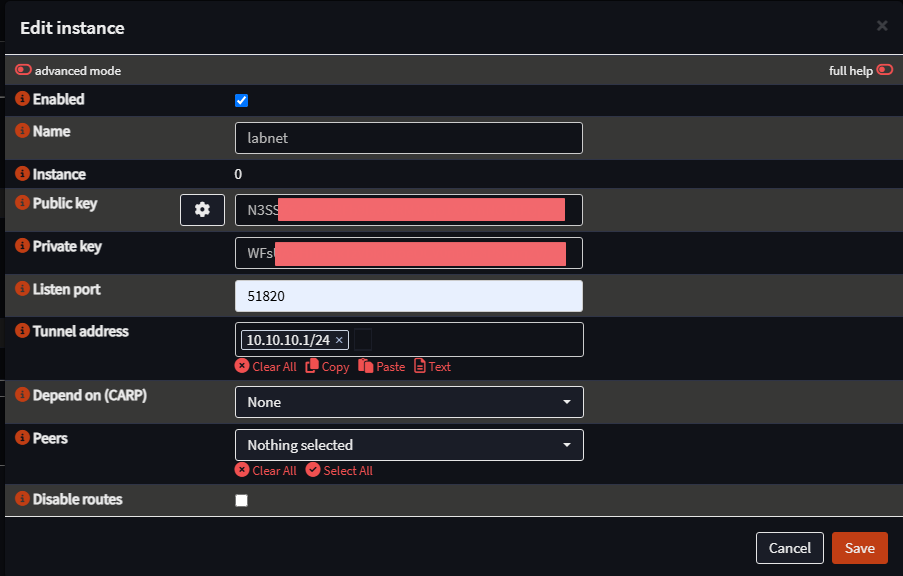
Start by going to VPN > WireGuard > Instances and Adding an instance. Use the settings in the screenshot below:
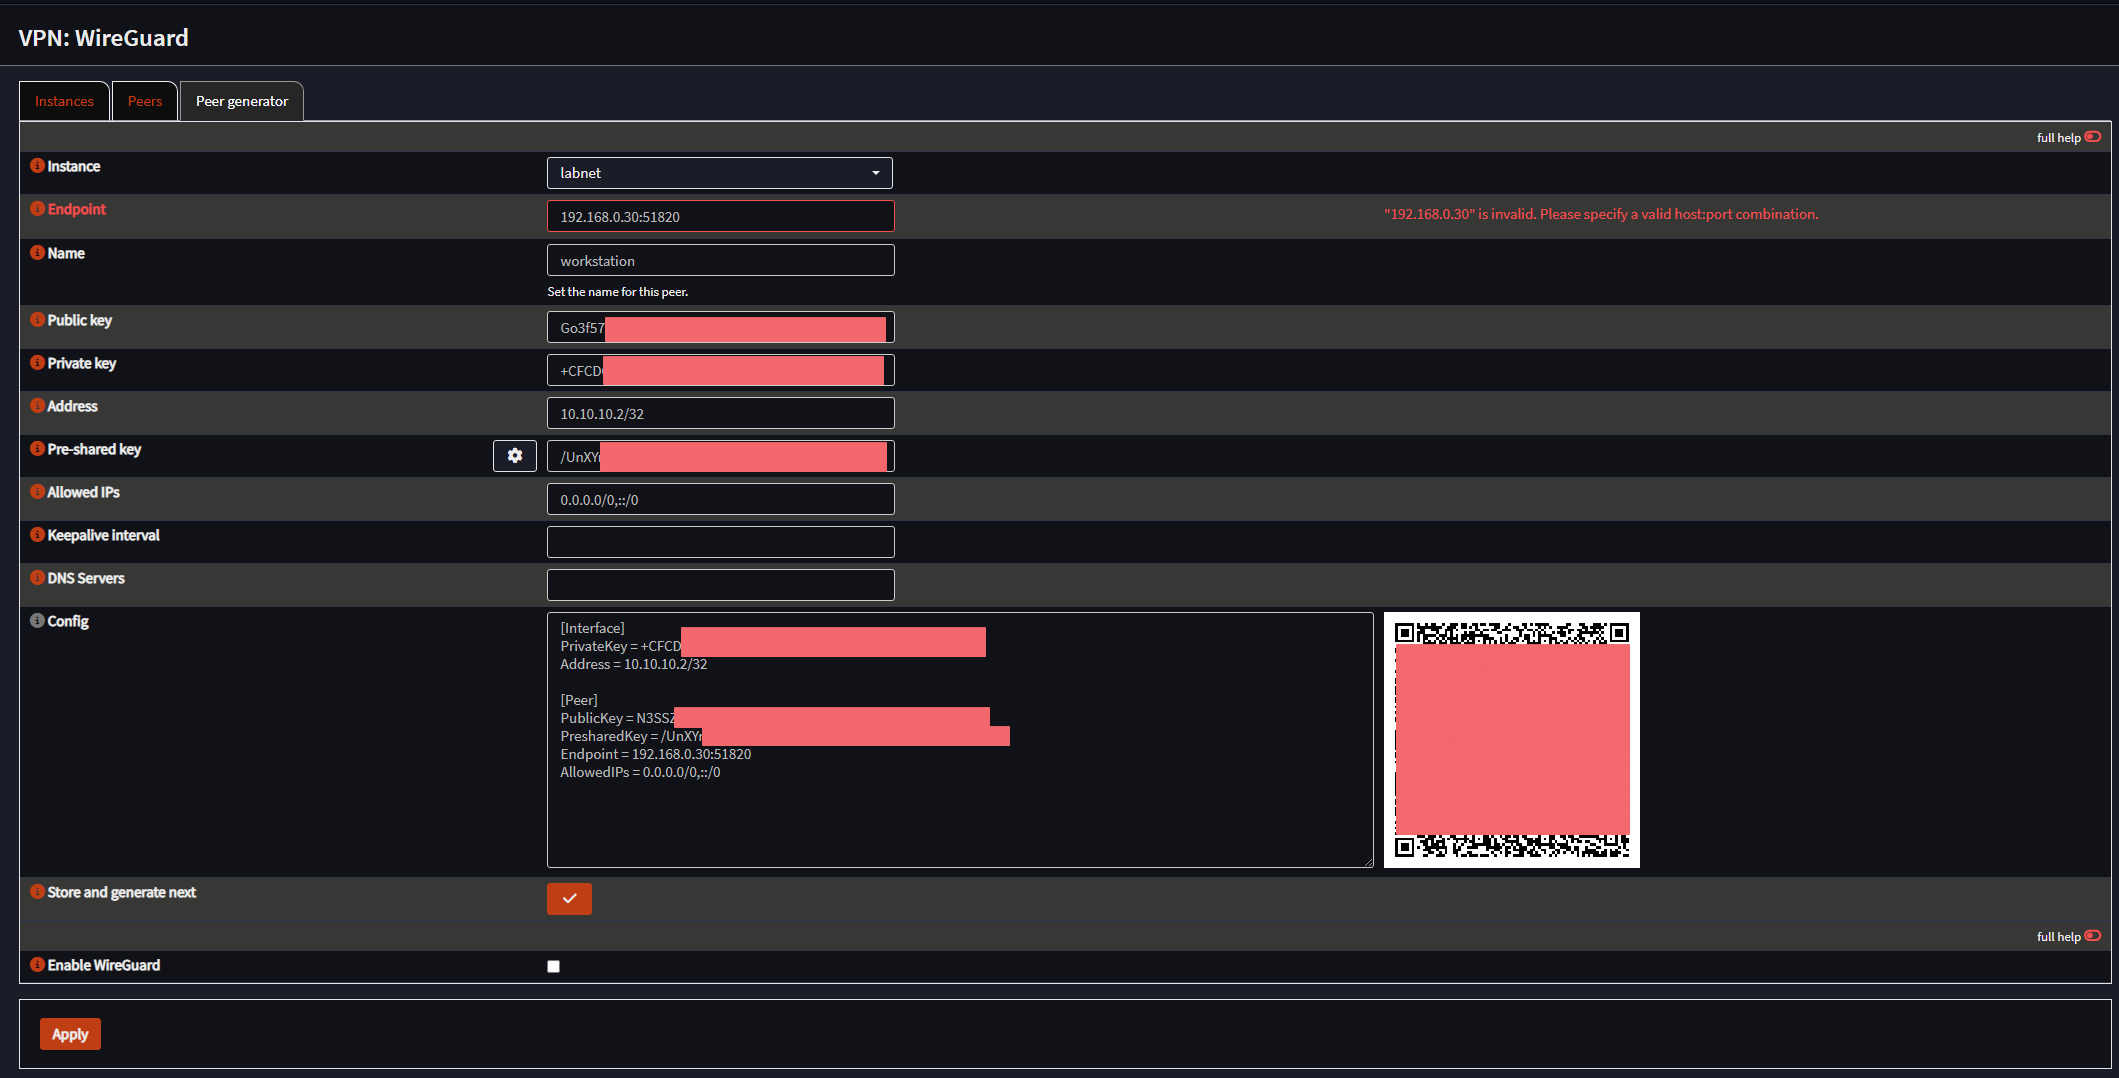
 Next, go to the “Peer generator” tab and fill in the information similar to the screenshot below. Make sure to copy the config section to a file before clicking Store and generate next.
 After saving that peer, check Enable WireGuard and click apply.
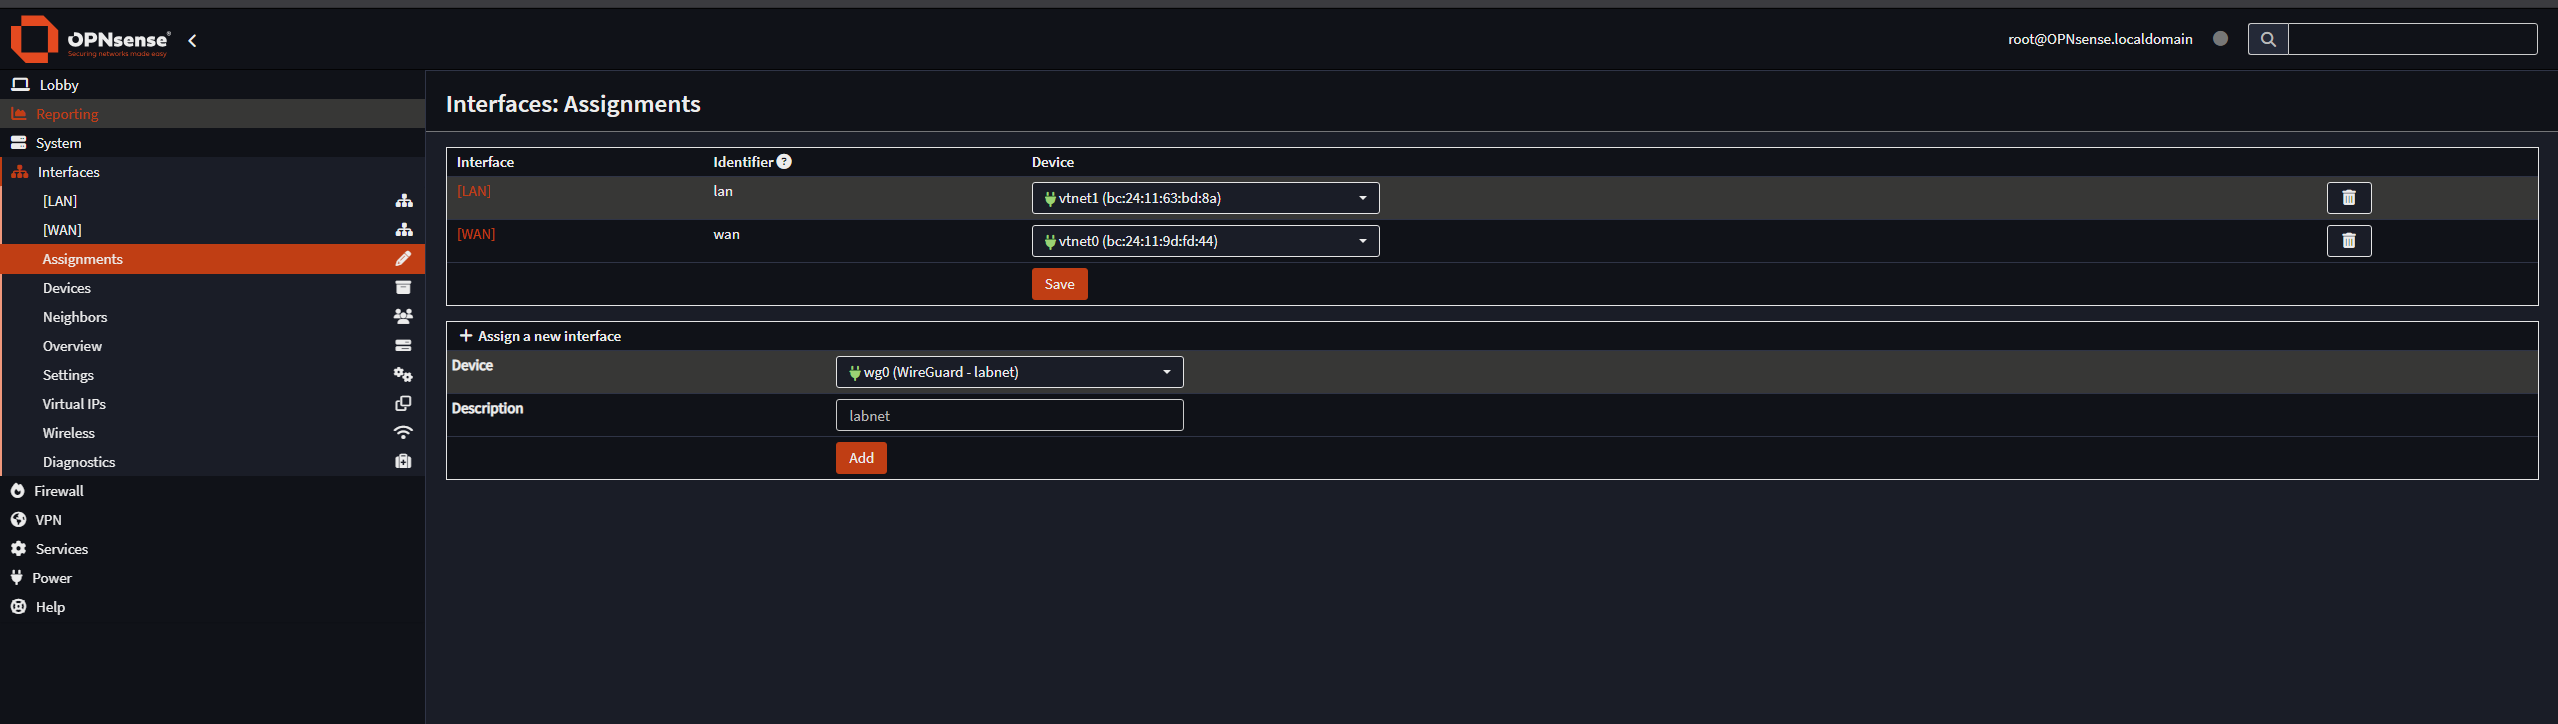
Next, go to Interfaces > Assignments and add the WireGuard interface as shown:
After saving that peer, check Enable WireGuard and click apply.
Next, go to Interfaces > Assignments and add the WireGuard interface as shown:
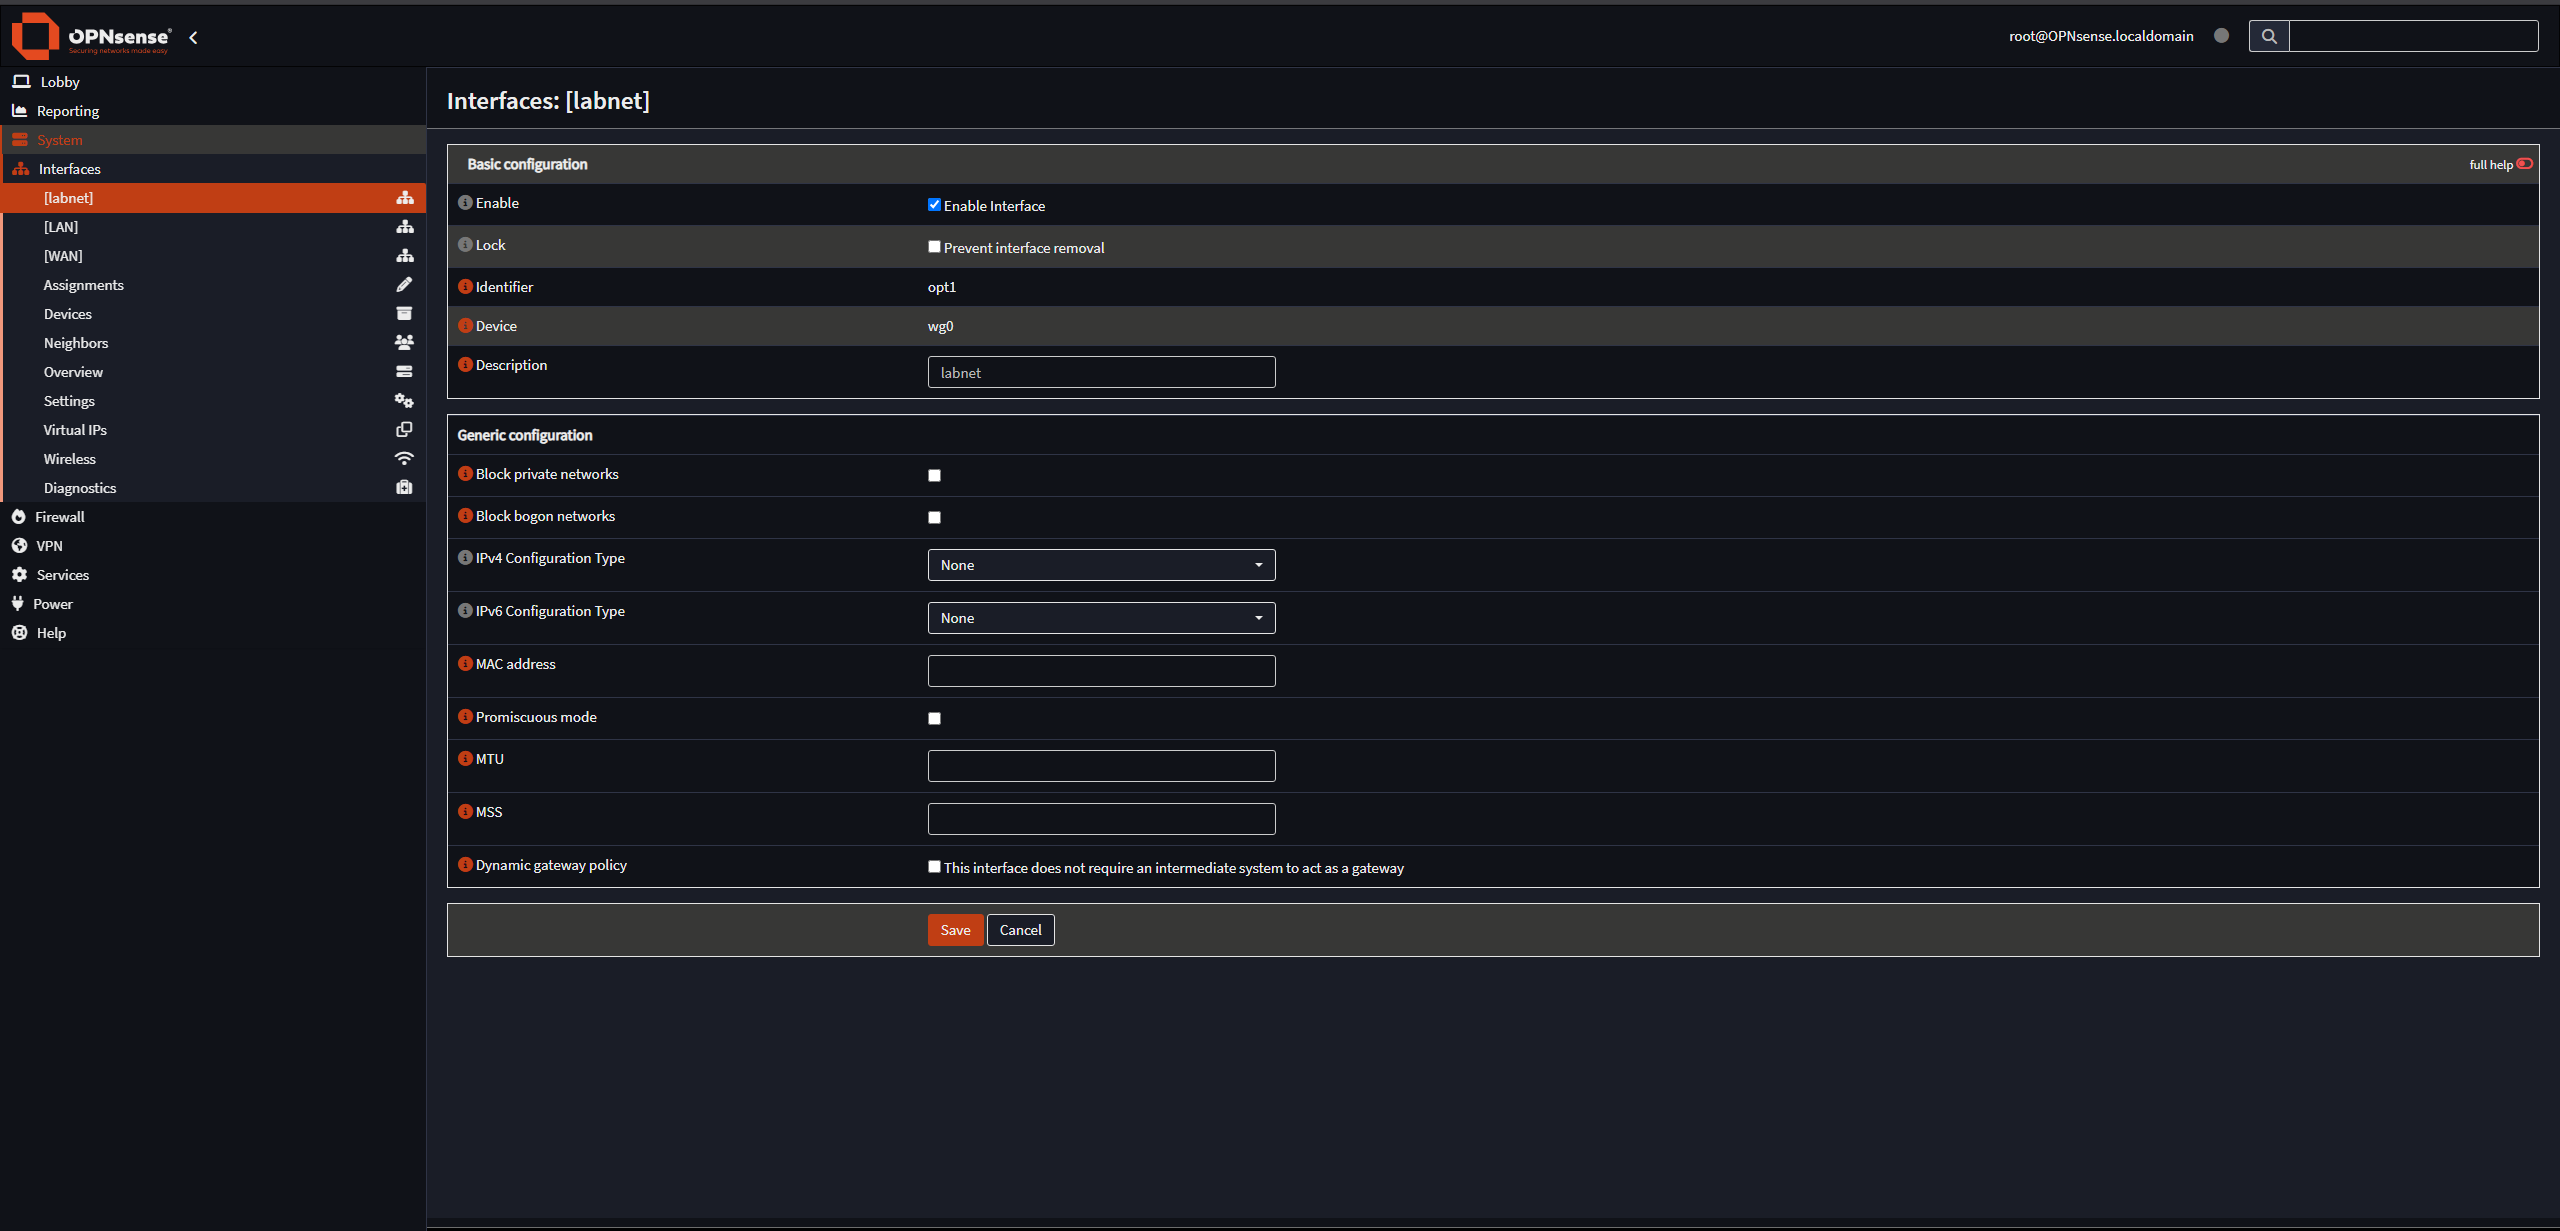
 Then go to the interface you just created and Enable it and save, as shown:
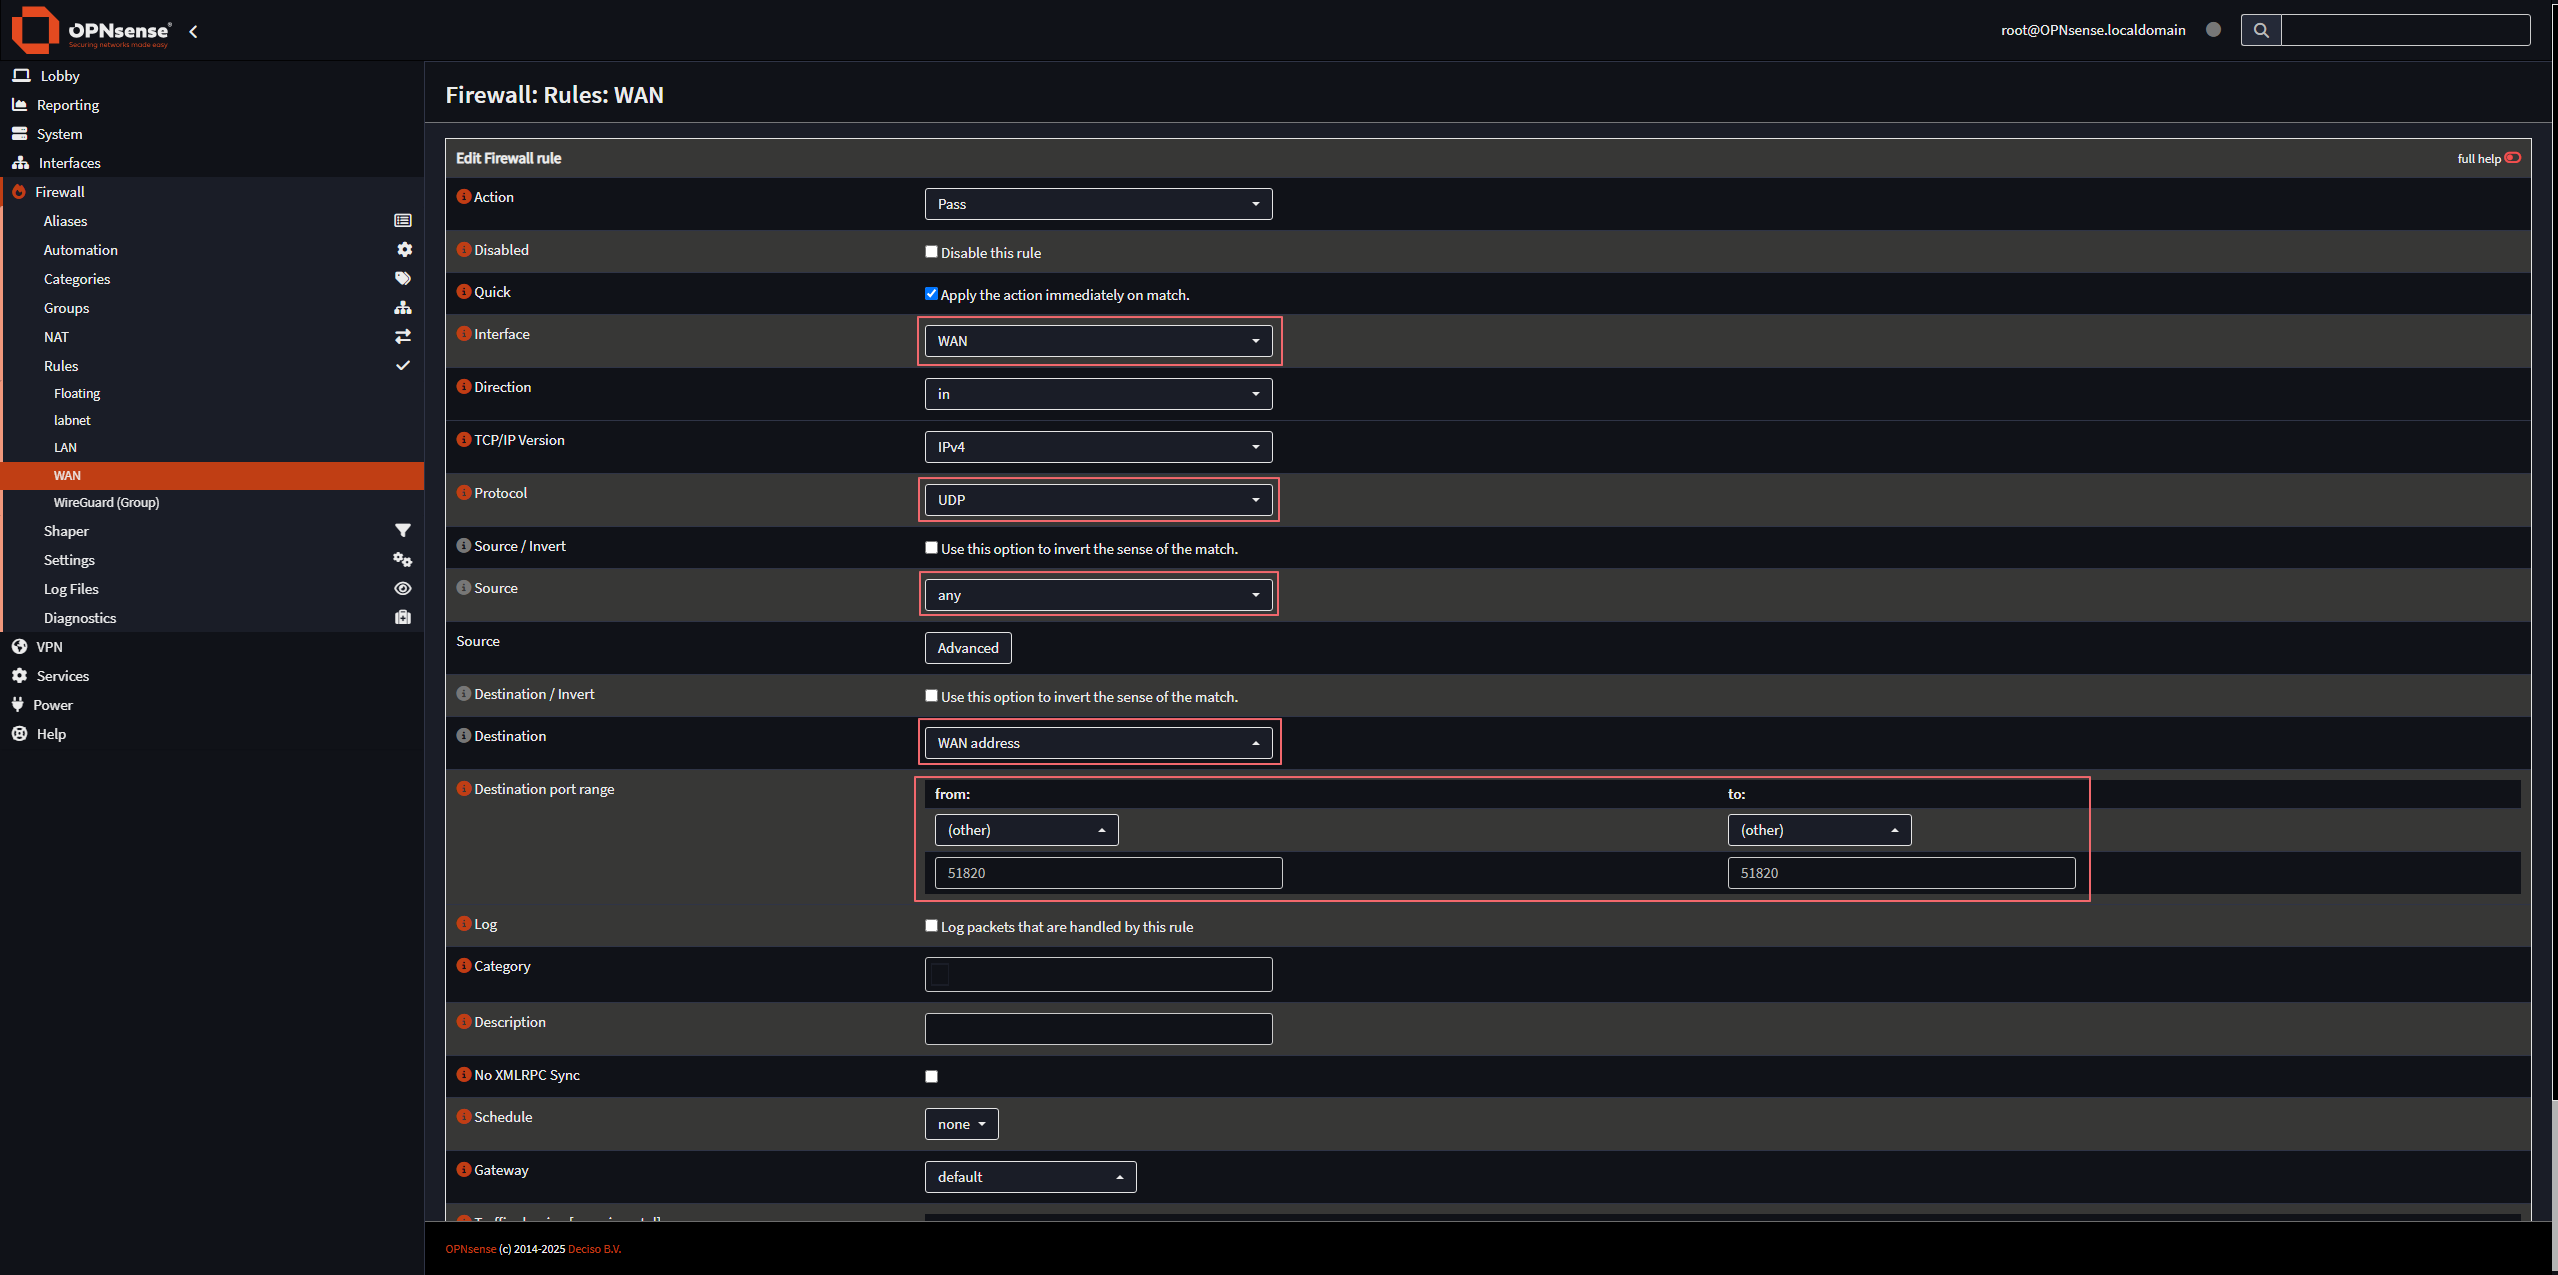
Next, we have to create firewall rules to allow the inbound connections to the WAN interface on the WireGuard port, and to allow traffic from the WireGuard interface to reach the LAN.
Start by creating a WAN firewall rule as follows:
 Then create a firewall rule on your WireGuard interface as follows:

Lastly, download the WireGuard client for your system and add your configuration that you copied to a file above. It should look something like this:
|
|
If you’ve done everything correctly, you should be able to access the Opnsense interface on the LAN side by accessing https://10.0.0.1 in your browser.
Wrapping up part 1
And that’s it for this post. I encourage you to play around and get familiar with Proxmox and Opnsense before continuing on to the next post. In the next post, we’ll get Elasticsearch set up along with Fleet and an Elastic Agent, and ingest logs from Opnsense into Elasticsearch.